niedziela, 2 czerwca 2019

[PATTERN] Easy Simple Cat

And here I am again - these days I was much more productive than earlier so I came up with another pattern. This one is very easy and it took me an hour to make this cat. It only uses basic stitches - magic ring, single crochet, double crochet and increase/decrease. Also, some slip stitches at the end.
It also requires minimal sewing, and if you don't have safety eyes, you can use felt, or embroidery to make them.
I hope you'll enjoy this pattern!
Keep an eye on my INSTAGRAM and FACEBOOK for extra patterns that are coming soon!

I used Madame Tricote yarn and a 2.5mm hook. You can of course choose any yarn you like, with a corresponding hook.


The cat's body is made in one piece:
1. mr, 6 sc in ring (6)
2. inc around (12)
3. *sc, inc* around (18)
4. *2 sc, inc* around (24)
5. *3 sc, inc* around (30)
6. [blo] sc around (30)
7. sc around (30)
8. 13 sc, dec, 13 sc, dec (28)
9. - 10. sc around (28)
11. 12 sc, dec, 12 sc, dec (26)
12. - 13. sc around (26)
14. 11 sc, dec, 11 sc, dec (24)
15. - 17. sc around (24)
18. 10 sc, dec, 10 sc, dec (22)
19. sc around (22)
20. 9 sc, dec, 9 sc, dec (20)
21. sc around (20)
22. 8 sc, dec, 8 sc, dec (18)
23. sc around (18)
- stuff the body 
24. 7 sc, dec, 7 sc, dec (16)
25. sc around (16)
26. 6 sc, dec, 6 sc, dec (14)
27. sc around (14)
- stuff more
28. *sc, inc* around (21)
29. *6 sc, inc* around (24)


30. *3 sc, inc* around (30)
31. - 37. sc around (30)
Now, use a wire or a pipe cleaner bent in half. Put it in the body, so the head won't be too wobbly. You can place the safety eyes now, too, if you use them.
Embroider a small triangle in the middle of the head. This will be the nose.
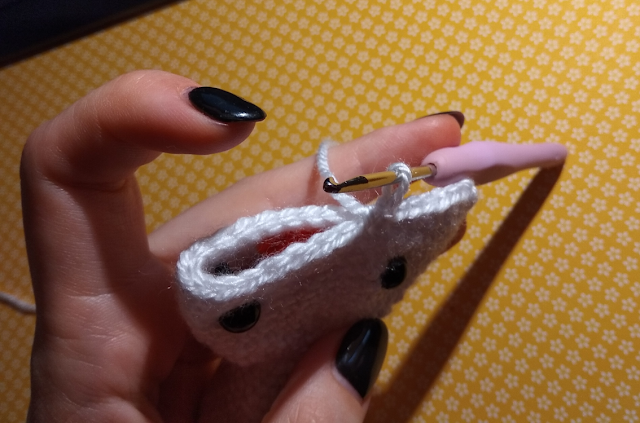
You will now be working on the head flattened, putting your hook through two stitches at once.
38. ch2, 2 dc, hdc, 5 sl st. Stuff the head now. 4 sl st, hdc, 2 dc. Cut off yarn, weave in end. The body&head part is finished now!


You can use a ribbon or just plain yarn to make a collar.


Now we'll make the tail. 

1. mr, 5 sc in ring (5)
2. - 27. sc around (5)
Cut off yarn, leave enough to sew the tail to the body. 
Sew the tail on. 


Your cat is finished!


Feel free to make as many of those as you like, but please, do not claim the pattern as yours. You can sell toys made out of this pattern but please credit me as the designer by including a link in your shop or just mentioning me :)
You can also add your finished projects on RAVELRY and tag me there.


poniedziałek, 27 maja 2019

[PATTERN] Mini Moon Bat - a goth amigurumi plushie!


Hello everyone!

Here I am again. This weeks have been more productive than the earlier ones. Maybe it's the weather, but it's much better to crochet when you don't feel cold and gloomy all the time!
Recently I've finished working on a crochet bat to decorate my office with. He is slightly inspired by the designs in Sailor Moon, nu goth fashion and japanese kawaii characters from series like Sentimental Circus. Everything was done by me and the pattern is mine, too.
Feel free to make as many of those bats as you wish but please do not sell them or the pattern claiming it's your design.
There are no photos to accompany the pattern though, as I didn't really think about sharing it and crocheted it for myself. It got really popular in Facebook groups though, so I think it's nice to share it.


For more creations by me, visit my FACEBOOK PAGE or INSTAGRAM.


And here is the pattern!
I used Madame Tricote Dora yarn and a 2.5mm hook. You can use any colors you like.

WINGS (make 2)
1. ch 2, turn, make 4 dc in the first ch st (4)
2. 4 db inc, ch 2, turn (8)
3. 2 dc in each of the next 2 stitches, 4 dc, 2 dc in each of the next 2 stitches. Ch 2, turn (12)
4. 2 dc in each of the next 3 stitches, 6 dc, 2 dc in each of the next 3 stitches. Ch 2, turn (18)
5. 2 dc in each of the next 3 stitches, 12 dc, 2 dc in each of the next 3 stitches. Ch 2, turn (24)
6. 4 dc, 4 sc, 2 dc in the next stitch, ch 1, 2 dc in the next stitch, 4 sc, 2 dc in the next stitch, ch 1, 2 dc in the next stitch, 6 sc. Ch 1, turn (26)
7. 7 sc, 2 dc in the next 2 stitches each, ch 1, skip 1 stitch, 2 dc in the next 2 stitches, 4 sc, 7 sc, 2 dc in the last stitch


BODY, starting with legs:
1. mr, 6 (6)
2. sc, inc around (9)
3. 2 sc, inc around (12)
4. - 7. sc around (12)
- make second leg
DO NOT cut off yarn on the second leg. Instead, make a ch 2 while still on the second
leg. Then, join with a sc to the first leg, in the last stitch.
Make a round of sc around both legs (including the ones with the chain) and on BOTH sides of the connecting chain. (28)
1 - 2. sc around (28)
3. dec, 12 sc, dec, 12 sc (26)
4. sc around (26)
- stuff the legs
5. dec, 11 sc, dec, 11 sc (24)
6. sc around (24)
7. dec, 10 sc, dec, 10 sc (22)
8. dec, 9 sc, dec, 9 sc (20)
- stuff the body a bit
9. - 11. sc around (20)
12. dec, 8 sc, dec, 8 sc (18)
13. sc around (18)

HEAD:
1. mr, 6 sc in ring (6)
2. inc around (12)
3. *sc, inc* around (18)
4. *2 sc, inc* around (24)
5. *3 sc, inc* around (30)
6. *4 sc, inc* around (36)
7. *5 sc, inc* around (42)
8. *6 sc, inc* around (48)
9. *7 sc, inc* around (54)
10. *8 sc, inc* around (60)
11. - 19. sc around (60)
20. *8 sc, dec* around (54)
21. *7 sc, dec* around (48)
22. *6 sc, dec* around (42)
23. *5 sc, dec* around (36)
24. *4 sc, dec* around (30)
25. *3 sc, dec* around (24)
26. *2 sc, dec* around (18)
- fasten off, leave enough yarn for sewing.

Cut off the NOSE from pink felt (or whatever color you like). Make it teardrop or 

heart-shaped and glue in place with a fabric glue.
Cut two small triangles out of white felt and glue them in place to look like teeth.

EARS (make 2):
1. mr, 6 sc (6)
2. inc, 2 sc, inc, 2 sc (8)
3. inc, 3 sc, inc, 3 sc (10)
4. inc, 4 sc, inc, 4 sc (12)
5. inc, 5 sc, inc, 5 sc (14)
6. inc, 6 sc, inc, 6 sc (16)
7. inc, 7 sc, inc, 7 sc (18)
8. inc, 8 sc, inc, 8 sc (20)
9. inc, 9 sc, inc, 9 sc (22)
10. inc, 10 sc, inc, 10 sc (24)
11. inc, 11 sc, inc, 11 sc (26)
12. inc, 12 sc, inc, 12 sc (28)
13. inc, 13 sc, inc, 13 sc (30)
- fasten off, leave enough yarn for sewing. Make second ear. Flatten them, fold slightly and sew on the head. Sew the wings to the body.
Cut off the felt shape of the stomach and glue it with the fabric glue. Cut a crescent moon out of white or cream colored felt and glue it on the bat's head.


You have your little bat now. Please share what you make out of this pattern and tag me on instagram @szydelkowe or on Facebook!
I am preparing another pattern right now, so keep an eye for it and visit my blog again! :)


środa, 15 maja 2019

PATTERN: Sabrina Spellman doll from Chilling Adventures of Sabrina (Netflix series)

I know I haven't been here for quite a long time. In fact, it was over a year since I released any free pattern. I wanted to change it and make something new.
As I've watched the first season of Chilling Adventures of Sabrina, I thought it might be a good idea to give something to her fandom :)
Here's an easy pattern to make your own tiny Sabrina.
If you're interested in more, keep an eye on my INSTAGRAM and ETSY.


SABRINA SPELLMAN PATTERN:

What you'll need:
  • yarn in dark brown, black, red and cream. (I used Madame Tricote Dora)
  • a crochet hook (I used a 2.5mm one)
  • toy stuffing (poly-fil)
  • safety eyes (I used black 0.8mm ones)
  • black felt
  • blonde-colored felting wool

Starting with LEGS:
- with brown yarn:
1. mr, 5 sc in ring (5)
2. *sc, inc* around (7)
- change to black:
3. - 8. sc around (7)
Stuff the leg.
Cut off yarn and fasten off on the first leg. When you finish the second leg, do not cut off yarn.
Make second leg. 
Connect the legs with a single stitch.
Now, make a round of sc on BOTH legs. You should have 14 scs then. Stuff the legs and continue.


Continue with the BODY:
1. sc around (14)
2. dec, 5 sc, dec, 5 sc (12)
3. - 5. sc around (12)
- stuff the body
6. dec, 4 sc, dec, 4 sc (10)
7. dec, 3 sc, dec, 3 sc (8)
- end with a sl st, cut off yarn.
Sew the head to the body, or do it after making the skirt, if you prefer.

Now make the HEAD:
- with cream yarn
1. mr, 6 sc in ring (6)
2. inc around (12)
3. *sc, inc* around (18)
4. *2 sc, inc* around (24)
5. *3 sc, inc* around (30)
6.- 10. sc around (30)
11. *3 sc, dec* around (24)
12. * 2 sc, dec* around (18)
- insert eyes between rounds 8 and 9. I usually put them 7-8 stitches apart. Stuff the 
head lightly.
13. *sc, dec* around (12)
- stuff more
14. 4 dec (8)
- cut off yarn. Fasten off, and leave enough yarn for sewing.
Sew the head to the body now.


Time for the SKIRT:
- insert hook in the back of Sabrina's body, in the 1st round after connecting legs.
- with black yarn
1. Make a round of sc around her body (14)
2. sc around (14)
3. inc, 13 sc (15)
4. inc, 14 sc (16)
- Finish with a slip stitch. Fasten off, cut off yarn, weave in end.


Now, it's time for the COAT:
- with red yarn
1. ch13, turn, 12 sc starting from second ch from hook.
2. ch 1, turn, 6 sc, inc, 5 sc (13)
3. ch 1, turn, 6 sc, inc, 6 sc (14)
4. ch 1, turn, 7 sc, inc, 6 sc (15)
5. ch 1, turn, 7 sc, inc, 7 sc (16)
6. ch 1, turn, 8 sc, inc, 8 sc (17)
7. ch 1, turn, 9 sc, inc, 8 sc (18)
8. ch 1, turn, 9 sc, inc, 9 sc (19)
9. ch 1, turn, 10 sc, inc, 9 sc (20)
10. ch 1, turn, 10 sc, inc, 10 sc (21)
11. ch 1, turn, 11 sc, inc, 10 sc (22)


- fasten off, cut off yarn, weave in the ends. The coat should look like this now:


Now, make the flaps on the coat. 
Insert your hook on the top edge of the coat on one side like this:


1. Ch 2, make 2 dc in the same stitch.
Cut off yarn leaving enough tail for sewing, fasten off. Then, bend the flap to the other side and sew it with the rest of the yarn left. 
Do the same on the other side.


Now, sew the coat to the body.

 Make the ARMS:
- With cream colored yarn
1. mr, 6 sc in ring (6)
2. sc around (6)
- change to red
3. - 9. sc around (6)
Fasten off, leave a tail for sewing. Make the second arm and sew them to the body.


Time for my favourite part of decorating - the HAIR!
To make Sabrina's hair you can use felting wool, like I did, or just sew multiple strands of blonde colored yarn to the head. You can use whatever method you like, but here's a short tutorial on how I made mine:
Take some wool (the kind meant for needle felting, preferably merino):


Cut enough to make Sabrina's hairstyle:


Place it on Sabrina's head and with a felting needle secure it on the head by repeatedly inserting the needle in the middle of the head. Secure it all the way down to the back of her head. Cut the hair to the desired lenght.


Then, cut a strip of black felt or fabric and glue it on her head as her headband.


Here, you're finished! You now have your own, tiny Sabrina Spellman!


Feel free to share the pattern with others by sending them the link, just do not copy and paste the pattern itself, please. You can sell finished dolls in limited quantity, but please credit me as the pattern designer if you do sell online :)

I may post some more patterns later this month - I've been working on some TV series characters, like Dean Winchester from Supernatural and Eleven from Stranger Things. Keep an eye for those patterns soon!

Have a witchy (and crafty... witchcrafty?) week!

niedziela, 18 lutego 2018

Miniature Pug Pattern

Hi again! 
I've been crocheting a lot in the recent weeks, and even wrote down some patterns. One of the patterns I wrote down was a pattern for miniature pug toy (perfect for a keychain!), which was a huge success - people in crochet groups asked if I can share the pattern and I've decided to do it.

It's very easy to make and it can be made with yarn scraps, as it uses just a small bit of it, as well as of filling. If you don't have safety eyes, you can use felt or embroider them. This makes a nice, quick project - if you crochet fast, like me, you can finish the pug in 30 minutes :)
The only things you need are yarn in the dog's coat colors (I used beige and black), some stuffing and two safety eyes (I used 8mm eyes).


Abbreviations (US Terminology):
sc - single crochet
inc - increase
dec - decrease
(...) - number of stitches in the round.
Do not join rounds! (work in continuous spirals)

HEAD&BODY:
1. magic ring, 6 sc in ring (6)
2. increase around (12)
3. *sc, inc* around (18)
4. *2 sc, inc* around (24)
5. - 12. sc around (24)
(insert safety eyes between rounds 7 and 8)
13. *2 sc, dec* around (18)
Secure the body, put it aside and make the MOUTH part now. Once you're done, sew the
mouth somewhere around round 8. Insert safety eyes on both sides of the mouth, slightly
higher than the mouth itself, then continue on making the body/head.
Stuff the body.
14. *sc, dec* around (12)
- stuff more
15. Dec around (6)
Cut the yarn and use a needle to weave it through the 6sc in round 15. Then pull the hole
closed and weave in the end.

MOUTH:
1. magic ring, 7 sc in ring, then slip stitch in the magic ring


EARS: (make 2)
1. magic ring, make 5 sc in ring.
Do not join, fasten off and leave enough yarn to sew the ears on.
Sew the ears on the same height as eyes.


PAWS: (make 4)
1. magic ring, make 4 sc in ring
2. sc around (4)
Fasten off, cut yarn, leave tail long enough to sew it on.
Sew the paws to the body.
They should be placed at equal distance around the base of the body, to form a square.


TAIL:
1. Chain 5, turn, 2 sc in each stitch of the chain.
Curl the tail and sew it to the back of the body.


(another example of a pug made out of this pattern)

Feel free to make tiny pugs for your friends and family - you can also sell those in small quantities, but please credit me as the pattern designer if you sell online.
I hope you will have fun crocheting this quick project :)


sobota, 10 lutego 2018

Valentina doll pattern

And here I am again! I didn't post here for a long time, didn't I? I didn't really have any ideas for new patterns, and I was so busy I didn't have time to even think about keeping the blog active.
Today, though, I am returning with a new pattern!
Once again it's a pattern for an amigurumi doll, easy and quick to make.
The pattern is free, though I'd appreciate if you'd placed a "like" on my Facebook fanpage, where I post pictures of my work, or followed me on instagram (@szydelkowe).
Feel free to modify the pattern to your liking, but please DO NOT copy and paste it anywhere else on the Internet. You can sell dolls made out of this pattern in small quantity :)


Materials needed:

Cotton yarn in red, pink, black, white and skin color. You can use any colors you like.
I used Altin Basak Myra and 1.9mm hook, but you can use any yarn weight if you select a corresponding hook.
Toy stuffing
Yarn needle
Two safety eyes

Abbreviations:

sc - single crochet
dc - double crochet
dec - decrease
inc - increase
mr - magic ring
[blo] - back loops only
*...* - repeat from * to *.
(x) - number of stitches at the end of the round.

Starting with FEET:
1. magic ring, 6 sc in ring (6)
2. inc, 2 sc, inc, 2 sc (8)
3. [blo] sc around
- change yarn to white
4. 3 sc, dec, 3 sc (7)
5. - 6. sc around (7)
- change yarn to skin color 
7. - 11. sc around (7)
12. inc, 6 sc (8)
13. sc around (8)
Stuff the leg.
Fasten off. Cut off yarn. Make second leg.
Do not fasten off or cut off yarn on the second leg. Make chain 1 and insert hook to the side of the first leg. Make a sc to connect both legs. 


BODY:

Now we have to make a row of scs on top of the connected legs. Since we used a sc to connect them, we have to change yarn color to pink:
1. 8 stitches on the first leg, 1 in the chain 1 we did to connect the legs, 8 sc on the second leg, 1 in the chain 1. (18)
2. 4 sc, dec, 6 sc, dec, 4 sc (16)
3. sc around (16)
4. 6 sc, dec, 6 sc, dec (14)
5. - 6. sc around (14)


Take two pipecleaners and fold them three or four times (depending on how long they are), twisting them. Put the pipecleaners inside the legs. You can stuff the legs lightly, if you feel pipe cleaners are not enough. Continue crocheting the body:

7. dec, 5 sc, dec, 5 sc (12)
8. - 9. sc around (12)

Stuff the body part.

10. dec, 4 sc, dec, 4 sc (10)
11. sc around (10)
12. Only make one dec this round (9)
Cut the yarn and use a needle to weave in end.


SKIRT:
Change yarn color to red (or any color you want the skirt to be). Holding the doll legs up, join the red yarn in the round 3 of the body, in the back.


1. sc around in the round 3 of the body (16)
2. inc, 4 sc, inc, 4 sc, inc, 5 sc (19)
3. inc, 5 sc, inc, 5 sc, inc, 6 sc (22)
4. inc, 6 sc, inc, 6 sc, inc, 7 sc (25)
5. inc, 7 sc, inc, 7 sc, inc, 8 sc (28)
6. inc, 8 sc, inc, 8 sc, inc, 9 sc (31)
7. inc, 9 sc, inc, 9 sc, inc, 10 sc (34)
8. inc, 10 sc, inc, 10 sc, inc, 11 sc (37)
cut off yarn, weave in end.


SKIRT EDGING:
Take the thin white yarn, join it in the middle of the skirt's last round (in the back) and repeat the following for the whole round, in back loops only:
1. sl st, 3 dc in one sc.
Once you finish the round, sl st in the first stitch, cut off yarn and weave in end.


HEAD:
using skin color yarn:
1. magic ring, 6 sc in ring (6)
2. inc around (12)
3. *sc, inc* around (18)
4. *2 sc, inc* around (24)
5. *3 sc, inc* around (30)
6. - 12. sc around (30)
13. *3 sc, dec* around (24)
14. *2 sc, dec* around (18)
Insert safety eyes between rounds 8 and 9.
Stuff the head lightly.
15, *sc, dec* around (12)
16. 3 dec (9)
Leave a tail long enough to sew the head to the body.


MOUTH:
Using red or pink thread, embroider a small V-shaped mouth.

ARMS: (make 2)
using skin color yarn
1. magic ring, 6 sc in ring (6)
2. - 6. sc around (6)
change yarn to body color
7. [blo] sc around (6)
8. - 10. sc around (8)
leave a tail long enough to sew the arms to the body.
Insert hook in row 7, take white yarn and crochet around the arm (6 sc). Slip stitch to the first one and cut off and weave in the white yarn.


SEW THE DOLL PARTS.

Now, make the COLLAR:
white yarn, slightly smaller hook:
1. chain 12, turn
2. dc in the second chain from hook, dc, 6 sc, 2 dc. 
Fasten off, leaving a tail for sewing.
Sew the collar around the dolls neck.


DETAILS:
Add shoe straps to the legs by simply attaching black yarn on one side of the 
foot and sewing and weaving it in on the opposite side.
Wrap some yarn around the dolls waist and tie it in the front, making a bow.

HAIR:
You can use any technique you like for the dolls hair, but in this tutorial I use one of the simplest techniques. Using textured yarn gives nice results. Cut strands of hair that will cover the head. Place it on the head and sew it on, using thin thread in a corresponding color. The sewing will be the hair parting. If you think the hair is too loose, you can also sew the loose strands to her hair, like I did. I made her hair short, as the yarn I use gives enough texture, but you can make it any lenght you want and style it any way you like.


Ta-daa! You should now have your own, cute, Valentine's Day doll. 
Feel free to put the pictures of the finished doll on Ravelry, Instagram or you can also send them to me via my fanpage's inbox.


Thank you a lot for visiting my blog :)