czwartek, 31 maja 2012

Viola and Lydia


Hi everyone!
In this post I want to introduce someone to you - their names are Viola and Lydia, they were "born" in May, 2012. One of them is from my improvised pattern, the second one is made of Free Spirit Doll Pattern.

Viola is the blonde one, while Lydia is a lovely brunette.

I like them both very much, neverminding the fact they took me so much time and work (I am very unpatient, so try to imagine how happy I was when I finished them after some hours of working)

Viola was kind of spontaneous work - one day I was very bored and I made a head. I forgot about it and it landed in my yarn basket.  After some months I found her head and thought I should finally do something...
I have about 4 heads lying on my shelf and waiting for their bodies...


And some of Violet's details:


Ps. I received a Spring Fairy pattern from Lous Labors to test - I can't wait to make one! :]

środa, 30 maja 2012

Ida Pattern (basic female doll)


Hello everyone! Here's my first pattern, which I wanted to publish. It's called "Ida Doll" and it's body only, so you can make face and hair your favorite way. If you don't know how to crochet doll clothes - some patterns will be available soon :)

Here are some useful tutorials, if my explanations aren't enough:
- Joining legs
- Attaching hair
- Attaching hair 2

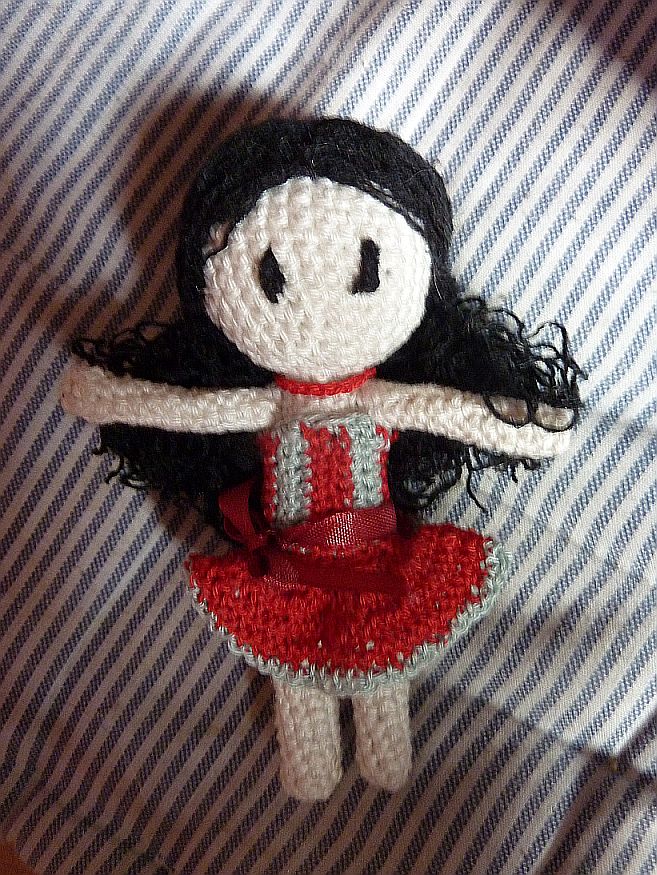
You can use yarn and hook of your choice, depending on how big you want the doll to be.
I used Altin Basak Miya yarn (134 yards/50g, 8ply) and 1.25 mm hook.
Stuff the doll with cottonwool, yarn scraps or whatever you like.

inc = 2sc in one st
dec = sc2tog
sl st = slip stitch
*...* = repeat until you have the number of stitches that is written in brackets

.
DOLL PATTERN:
Head:
Working from top to bottom.
1. magic ring, 5 sc in ring (5)
2. inc in each st (10)
3. *inc, sc* (15)
4. *inc, 2 sc* (20)
5. *inc, 3 sc* (25)
6. - 12. sc in each st (25) 
- start stuffing here
13. *3 sc, dec* (20)
14. *2 sc, dec* (15) 
- stuff more
15. *sc, dec* (10)
Fasten off with a sl st, leaving a long tail for sewing.

Body:
We start with making two separate legs, working from the toe.
Tips:  If you want your doll to have shoes already, start with a contrasting color and change to skin color after some rounds. You can put pipecleaners inside the legs, so you can bend them.
1. magic ring, 5 sc in ring (5)
2. inc in each st (10)
3. - 4. - sc in each st (10)
5. dec, sc in next 7 sts. (8)
6. - 14. sc in each st (8)
Stuff leg, fasten off with a sl st. Leave a short tail (you should hide it in the body later.)
Make second leg.
Hold legs together, insert hook through one loop in each and yarn over.
Continue crocheting on stitches of both legs, until you have 16 stitches - this is how the body starts.
1. - 7. sc in each st (16)
8. dec, 6 sc, dec, 6 sc (14)
9. - 15. sc in each st (14)
16. dec, 5 sc, dec, 5 sc (12)
17. sc in each st (12)
Fasten off, leaving a long tail for sewing.


Arms (make two):
1. magic ring, 5 sc in ring (5)
2. inc in each st (10)
3. - 6. sc in each st (10)
7. dec, 3 sc, dec, 3 sc (8)
8. sc in each st (8)
9. dec, 2 sc, dec, 2 sc (6)
10. - 16. sc in each st (6)
Fasten off with a sl st, leaving a long tail for sewing. When you have two arms, sew them to body. You can stuff them or put pipecleaners in them, too.

Sew parts together, make face, clothes, hair and enjoy your new doll!
Clothing patterns will be available soon :)

Hello!


Hello everyone and welcome to Hook and Stitch!

I wanted to finally make my own site about crocheted dolls and toys, so here it is!

Crochet is a very popular technique, you can craft a lot of things using yarns and hook - from bookmarks and phone cozies to jewelry, clothes and toys.
Although the blog will focus on dolls and softies, the other stuff probably will be mentioned too.

I'm going to post my own patterns and creations here,
write useful tips for newbies in amigurumi doll crocheting, and finally - babble about random interesting things :)

You can also find a lot of interesting links here!


Ps. : On this photo you can see my creation, a doll called Viola. It's made out of wonderful pattern by Beth Ann Weber.